Inside of workbench you can find the workbench options menu. Let’s check it out!

As you can see on the left nav tree, there are lots of workbench options you can play with. Today we will be looking at code signing though. Here you can see that my signing cert dropdown menu currently has “progobjsigner” selected. Yours will not have that option and will likely be blank. We will make one though!

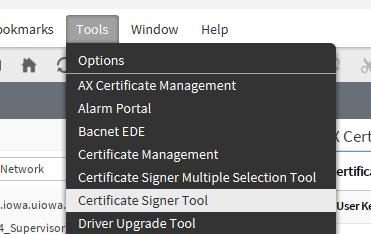
Going back to the tools menu, we can see there is an option for Certificate Management. Notice: This will be in reference to your own platform and workbench.

I will use the AX version..

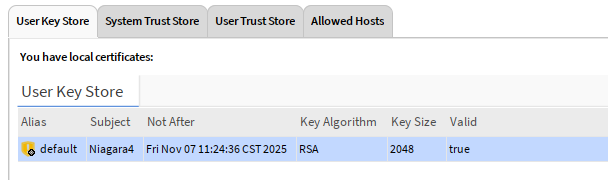
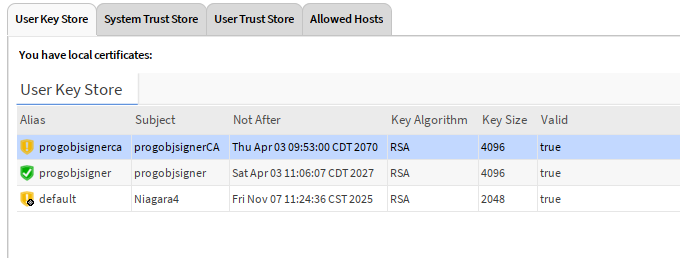
Here is what a good signing certificate should be represented in the User Key Store of your Certificate Management view.

Sadly, I will now delete my cert. But we will make another.
Certs, Certs and more Certs… and CA’s
Within the menu you will see New Cert as an option.

Info on Self-Signed Certificate Fields:
Alias:
- The alias is a friendly name given to the certificate within a keystore, not part of the certificate’s subject.
- It’s a way to identify the certificate within a specific keystore (like when using
keytoolor similar).
Subject Distinguished Name (DN):
The DN is used to identify the entity the certificate is issued to.
- CN (Common Name):
- The fully qualified domain name (FQDN) of the server (e.g.,
www.example.com). - Can also be a person’s name, server name, etc.
- The fully qualified domain name (FQDN) of the server (e.g.,
- OU (Organizational Unit):
- A department or division within the organization (e.g.,
IT Department,Sales).
- A department or division within the organization (e.g.,
- O (Organization):
- The legal name of the organization (e.g.,
Example Company).
- The legal name of the organization (e.g.,
- L (Locality):
- The city or location (e.g.,
Anytown). - ST (State or Province):
- The state or province (e.g.,
California).
- The city or location (e.g.,
- C (Country):
- The two-letter country code (e.g.,
US,GB).
Certificate Settings/Extensions:
- Key Size:
- The length of the key used in the certificate’s public/private key pair.
- Examples: 2048-bit RSA (common), 3072-bit RSA, 4096-bit RSA, or a suitable size for Elliptic Curve Cryptography (ECC).
- Stronger encryption can result in slower performance but greater security.
- Certificate Usage:
- Specifies what the certificate can be used for.
- Examples: Server authentication, client authentication, code signing, email signing.
- Subject Alternative Name (SAN):
- Allows additional host names, domain names, IP addresses, etc., to be associated with the certificate.
- Often used for multibal-domain or wildcard certificates.
- Key Usage:
- Specifies the allowed operations of the key.
- Examples: digitalSignature, keyEncipherment, dataEncipherment, certificateSigning.
- Extended Key Usage:
- Further specifies how the certificate’s key may be used
- Examples: serverAuth, clientAuth, codeSigning, emailProtection.
Example:
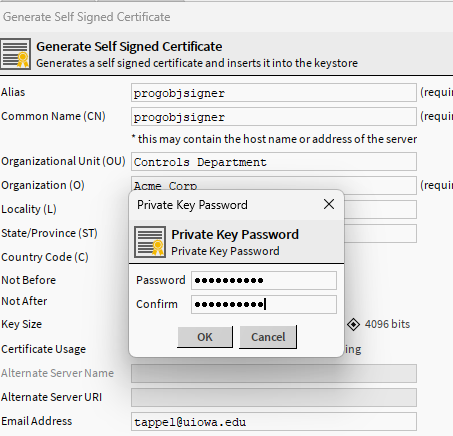
For our example programobjsignerCA we are going to reuse some feilds. This is not a server certificate
- Alias:
progobjsignerCA - CN:
progobjsignerCA - OU:
Controls Department - O:
Acme Corp - L:
Iowa City
You will notice that there are some fields that are marked (required). We will use those but will omit some of the others.
I have highlighted some of the areas that I wanted to draw attention to. For the CA, here is what I put down.

Notice the “Not After” is out to the year 2070 ![]() . You cannot get away with this outside of self signed
. You cannot get away with this outside of self signed ![]() .
.
I chose 4096 bits as I believe I read somewhere in workbench docs, maybe doc developer(?) to use this setting.
Key usage I left at default selections after the CA selection.
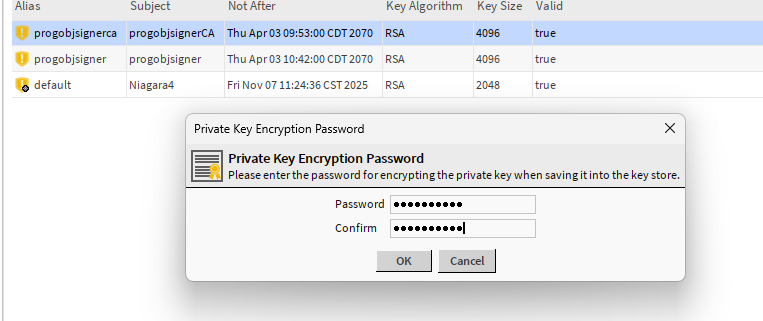
After choosing the OK button, you will see a password prompt. Go ahead and give it your super secret password

Yay! You should be prompted that the system is creating. Just accpet ok and move on.

Now we have the certificate, but you can see it is yellow. Not trusted.

We are now going to export this certificate and then import it back into the User Trust Store. So highligh the certificate and choose export. Make sure the “export private key” is selected.
Now you need to remember that super secret password from before and add it to the export here!

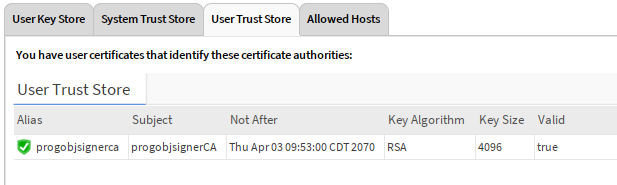
Once exported, we will need to import into that User Trust Store. Select that tab and then select the Import button below.

Select the new CA we just made and exported

Select OK and now you should see the green checkbox for the cert. ![]()
OK, so we have a CA. Now what
Back to User Key Store and create a new certificate. This time select Code Signing. You can basically leave the rest the same as the CA. Other than the Alias and CN, of course.

And you will need to add another super secret password here.
Certificate Signing Requests (CSR)
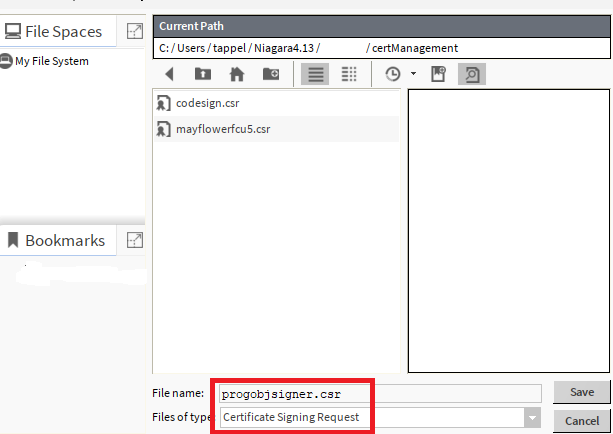
Find the recently created certificate (progobjsigner) and now we will select the Cert Request
Go ahead and select OK
Yay more passwords!
You will be prompted with a save prompt. Notice the file type here. Go ahead and save, if the location works for you. My path for this is in user home .certManagement. You can choose any location, but this is probably the best.
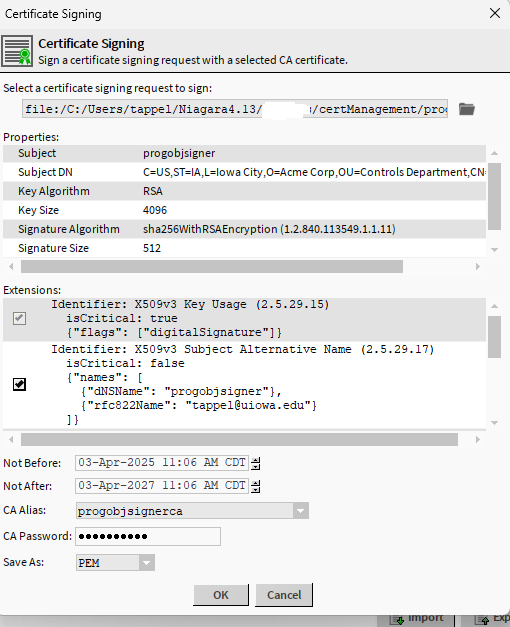
Time to sign the CSR with our shiny CA!
Go ahead and select the tools menu → Certificate Signer Tool.
Once selected you will get prompted for selecting the CSR. We will select our newly created progobjsigner.csr

Notice here that the menu on the left - the actual prompt before I chose the file selector icon - already has the programsignerca selected.
Once you choose the file you will have another prompt, here is where you will add the password (private key) for the signing certificate (CA password). You can also notice that the Not After date might not match your original date. Here mine is 2 years. Its fine for me for the example, but you might want to bump that.
Once again, another prompt ![]() . Go ahead and save over the original. Maybe this isn’t the best approach, but it works.
. Go ahead and save over the original. Maybe this isn’t the best approach, but it works.
Time for the magic
Go back to the User Key Store and select import.

Select OK on the preview of the certificate
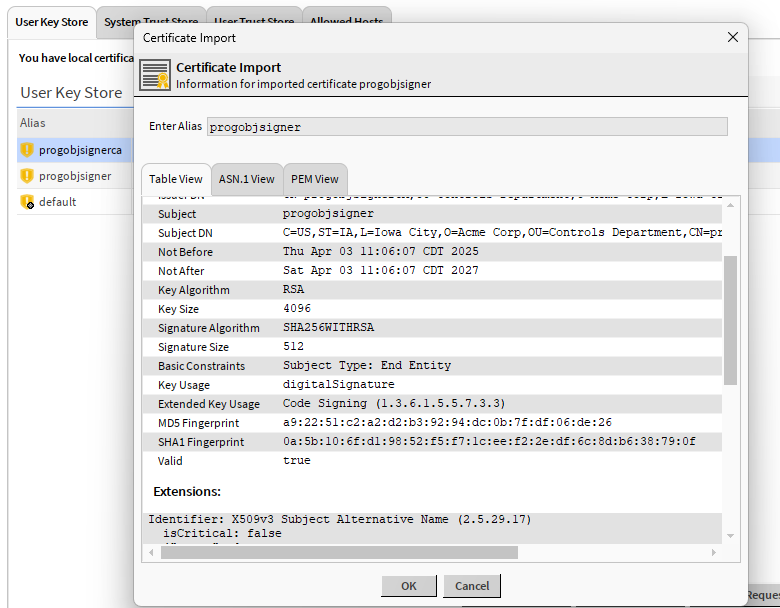
I was prompted with a password entry because the store already contained the entry under that alias. So, enter the password or go back and delete it out of the keystore first and come back to import.

And again, enter the private key password for the certificate. Last time, for this one ![]() .
.
You should now have that green checkmark ![]()
![]()
Go sign some program objects!!
If you go back to the tools menu → options → code signing options. You should now have the option to use your new shiny cert!

I believe that the next time you go to compile a program object, you might be prompted for the private key agin, but it will sign the program objects!