Hierarchy Guide for Beginners
Version 1.0
This guide will walk you through making a simple hierarchy structure in N4.
No prior knowledge is required, though I won’t go in-depth with NEQL, which we will use to create the hierarchies.
What are hierarchies in Niagara
A hierarchy in Niagara is a dynamic navigation menu aimed at the users or clients of the station.
It’s built by leveraging tagging on the station and using NEQL statements. Don’t worry, I’ll guide you through it as gently as I can ![]()
So I should always use hierarchies?
God no!!! Hierarchies are great for large-scale systems, where you can get a huge navigation structure that isn’t easily maintained through nav files or simple px menus. Especially if it’s a client that often adds new systems that need to be implemented in N4.
In a shared hosted environment, with multiple clients on the supervisor, I think it’s a great system.
For the local autoshop with minimal equipment and no supervisor, but just a direct connection to the JACE, it’s overkill. Use a nav file instead.
But I can make a menu in px
You can fix most car issues with gaffer tape… That doesn’t make it a good solution.
But hierarchies are ugly!
Yep… I won’t disagree with you. But luckily you can do something about that and customize the look however you wish. You just need to know some bajascript, but that’s a topic for another day ![]()

Let’s begin
This could have been the place I supplied you with a .bog file, with the basic setup… But I won’t
This way you will get a better understanding of the subject
Preparing yourself
This might be a long one, so get your snacks and drinks ready before you read any further!
Ready? Great!
Now start up workbench and a station.
Preparing the station
Before we start building the hierarchy, let’s prepare the station. To do that, we need to install the Haystack tag dictionary and make a folder structure to resemble a site.
Haystack
I’m assuming you are using Niagara 4.13 to make use of Haystack4
Open the haystack palette and drag Haystack4 onto the TagDictionaryService under Services

Folder Structure
Make a folder structure resembling this. It’s not important what you call your equipment, so if you want to call your rooms “Zone00001, Zone00002” and so on, be my guest.
You can make it anywhere on the station. I have made mine in a folder called HierarchyChallenge directly under config… Guess what my next challenge topic will be ![]()

Tags - Semantic Model
Now that everything is set up, we need to tag our folders, so we have something to build the hierarchy with.
Tagging is a way to define every part of your BMS system and it’s a huge topic, which you can read more about here: (6) A BMS ENGINEER’S QUICK GUIDE TO SEMANTIC MODELING (TAGS, HAYSTACK, BRICK, REC, etc…) | LinkedIn
There are no official guidelines yet on how a BMS system should be tagged, but there are efforts made to create standardized semantic models. You can follow the work here, if you are interested: 223 Overview — ASHRAE Standard 223P User Documentation (open223.info)
In this guide, we will ignore all these lengthy guides, that can’t agree on a semantic model, and create our own very simple model.
Our model is gonna look like this:
tagDictionary:tag [type] - description- h4:siteRef [string] - Every folder will get this tag, to define which site it belongs to.
- h4:equipRef [string] - Every piece of equipment and room will get this tag, to define what kind of equipment it is.
- h4:equip [marker] - Every piece of equipment with a px view will get this tag.
I know we don't have px views in this setup, but in a real project most of the equipment would have views defined.
Tagging the Station
Start by Right clicking the "London" folder and select Views -> Tag Manager.
This is the Tag Manager view and it’s a great tool to quickly tag many components of the station. Learn to love it!
Right now we only have the London component in the list on the left side of the view, but we want every component in our setup.
Expand all folders and mark them all, except "London" like in the next screenshot and drag them all to the component list in the tag manager.

Let’s start with the first tag in our model, the h4:siteRef tag. We have two locations, London and Tokyo, indicating it’s a huge client and we should charge extra.
Select every component belonging to the London locationSelect the "Haystack4" dictionary in the dropdown box at the top of the viewSearch for "site"

By selecting multiple components but not all, only the selected components in the list will be tagged.
Drag the siteRef tag down to the lower half of the split screen and a popup should appear. Fill in the "Value" field with "London" and click OK. You should now have something that looks like this:

Now select all "Tokyo" components and give them the siteRef tag with the value of "Tokyo"
Select all equipment, search for the "equip" tag and drag it to the lower split pane like in the screenshot:

The last tag is the h4:equipRef tag.
For this, we will select each group of equipment in turn, give it the h4:equipRef tag and fill in the value like this:
- AHU[xx] value: Ventilation
- HWS[xx] value: HotWaterSystem
- Room[xx] value: Rooms
With everything tagged, we can now start building the hierarchy ![]()
![]()
![]()
Building the Hierarchy
Go to the "HierarchyService" under "Services".Open the "hierarchy" palette
The first thing we need to do is drag a "Hierarchy" from the palette and drop it in the "HierarchyService". When prompted for a name, write the company name of the client. In this example, that’s “Acme”.
I usually create a hierarchy per customer, sometimes more, as it’s a great way to control who sees what. If you have multiple hierarchies and make a new user role, you can select which hierarchies are viewable to that role, like in this screenshot:

Here you can see the difference between logging in as an Admin and a user with the “AcmeTokyo” user role:


Back to our hierarchy!
Go to the AX Property Sheet of our newly created "Acme" hierarchy.Expand the "Scope" property and then expand "Station"Set the "Scope Ord" to the "Acme" folderso we only search for tags in this location

If you look at the Hierarchy, you can see that it’s pretty empty:

We have a few tools at our disposal to build a hierarchy, when you look at the palette. In this simple demonstration, we will only use GroupLevelDef and QueryLevelDef, but I strongly suggest that you read the help docs on every tool and play around with them. Hierarchies can be very versatile.
Our structure will look like this:
- Acme [hierarchy name]
-
- Location [GroupLevelDef based on h4:siteRef]
-
-
- Equipment Type [GroupLevelDef based on h4:equipRef]
-
-
-
-
- Equipment [QueryLevelDef based on h4:equip]
-
-
Let’s drag a "GroupLevelDef" from the palette to the Acme hierarchy and name it "Location".
A GroupLevelDef creates groups based on the value of a tag.
If you have a string tag called h4:superhero on multiple components, where some of the components have the value in the tag set to “Batman”, others to “Superman” and the rest to “Austin Powers”, then three branches would be created in the hierarchy called “Batman”, “Superman” and “Austin Powers”.
In “Group by” we will write h4:siteRef
Now drag another "GroupLevelDef" onto the Acme hierarchy and name it "EquipmentType". Group by h4:equipRef.
Drag a "QueryLevelDef" onto the Acme hierarchy and name it "Equipment". Fill in the “Query” with h4:equip to select all components with this tag.
Hierarchies are read “top-down”, so the “Location” levelDef is evaluated first, then the “EquipmentType” levelDef and lastly the “Equipment” levelDef even though they aren’t nested.
Every time you make changes to a hierarchy setup, remember to right click “Hierarchy” in the station and select “Refresh Tree Node”

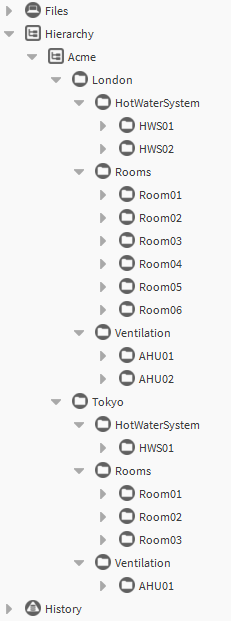
Check out your super nice hierarchy in the station now
Playing around with the setup
Reordering the hierarchy
Try duplicating the “Acme” hierarchy and reorder the GroupLevelDef’s in the new one, so “EquipmentType” is first.
Refresh Tree Node and check out the new hierarchy

Create new equipment
Try copying the “AHU01” folder and paste it to the “Rooms” folder and rename it “AHU03”
Refresh Tree Node and check to see how AHU03 is still grouped under “Ventilation”, even though we pasted it to the room folder. This is because the hierarchy is only looking at the tags, not the location.
If you pasted it outside the “Acme” folder, it wouldn’t show up, as we set the scope to only look for tags inside “Acme” and its children.


